New Qlone by GeorgeMeadows on Sketchfab
Augmented Reality in the K-12 Classroom
A resource site for educators interested in the use of Augmented Reality in the K-12 classroom.
Friday, June 26, 2020
Sunday, November 3, 2019
Google Expeditions for AR
Google Expeditions is a free app that gives you access to hundreds of AR objects, all arranged in categories. The quickest way to use the app is to open it, select AR from the menu, and you'll see the list of categories, each having a few images to view. Select an image, point your phone or tablet at the location where you want the AR object to appear, and click. It take a few seconds to download the image, then it will appear. You can resize (bigger or smaller) the object and while you can't rotate by moving the object on the screen, you can walk around the object to see it from any point of view.
You can also create AR tours in your classroom by selecting the objects you want students to see, printing the AR markers and placing them around your room. When students scan the markers, they'll see the AR objects. Here's a link to a teacher-created youtube video that provides a quick and easy to follow demo showing how it's done: https://www.youtube.com/watch?v=ekf7JG5APZY
You can find out more about Expeditions here: https://edu.google.com/products/vr-ar/expeditions/?modal_active=none
Using HP Reveal to Create AR Objects
Creating an AR object with HP Reveal is pretty simple. You're just using the app to add virtual content to an image, object, or block of text. You can see a quick and easy to follow introduction to the process here: https://www.youtube.com/watch?v=lTGpjG_T7z8
The first step is to create an account. You can do that here: https://studio.hpreveal.com/landing
The app will work for android tablets and phones as well as Mac phones and IPads.
As an example, I might be doing a brochure or story about birds at Crow's Nest. I'm going to print the brochure, but I'd like folks to see AR content when they scan the image of a particular bird with their phone or tablet. I might want to link a photo of a Green Heron (from Green Heron pond at the Crow's Nest site) to a location on a map of the area. So, once I've started the app, I would take a photo of the object/image/text I want for the target image, in this case the Heron.
Then I will be prompted to provide the Overlay - that's the AR that will pop up when the target image is scanned. I've decided that I would like to have a map view of the Crow's Nest area pop up. So I'll upload my Overlay image.
Then share your aura (the virtual content linked to the photo) so that others folks who have the HP Reveal app can see your AR when they look at the image. They will have to follow you, in their HP Reveal account, to see it.
The first step is to create an account. You can do that here: https://studio.hpreveal.com/landing
The app will work for android tablets and phones as well as Mac phones and IPads.
As an example, I might be doing a brochure or story about birds at Crow's Nest. I'm going to print the brochure, but I'd like folks to see AR content when they scan the image of a particular bird with their phone or tablet. I might want to link a photo of a Green Heron (from Green Heron pond at the Crow's Nest site) to a location on a map of the area. So, once I've started the app, I would take a photo of the object/image/text I want for the target image, in this case the Heron.
My target image.
My overlay image.
Sunday, June 30, 2019
Curriculum - Mixed Reality Links
This is a link to a document suggesting possible curriculum - Augmented Reality/Augmented Virtuality connections. Most of the links are to Amazon pages where you can see the object, the price, and a short description. I've focused more on the Science links because that's what I know best but I think the materials I've suggested for other content areas will also provide some great opportunities for teaching/learning. And, as AR/VR develops, I think there will be many more resources for all content areas.
I think the idea of having students and teachers create their own AR/VR content is very promising and I added a short section with a couple of links for apps that allow that to happen.
I will have most of the materials available for future meetings and it would be helpful if when you find something that sounds relevant or interesting you download that app to your phone or tablet. I will bring my phone and a couple of tablets with a few apps already loaded.
You might also think about making use of Apple TV or Google Chromecast. As Tim demonstrated at our last meeting, that can make a huge difference in showing these apps to more than the one or two folks who might be able to gather around a phone or tablet screen.
https://drive.google.com/open?id=1lgRTAq5FEQOBW-lZ-d-6M-V5H8DPNfF2
Sunday, May 26, 2019
Augmented Virtuality - AR in Reverse
In Augmented Reality (AR), you add a virtual element (using your phone or a tablet) to a physical object or setting. What if you do the reverse - add physical objects to a virtual setting? That's Augmented Virtuality (AV), and both fall under the heading of Mixed Reality (MR).
Most of the resources I've described in this blog would be described as AR, where an image in a book or a physical object, in combination with a phone or tablet-based app, is linked to some virtual material (video, animation, sound.) Dinosaur 4D+ cards would be an example. Scanning the illustration of the dinosaur on a card adds a virtual animation of the dinosaur to the card.
In this post I would like to describe some educational resources that can be described as AV.
BLOXELS
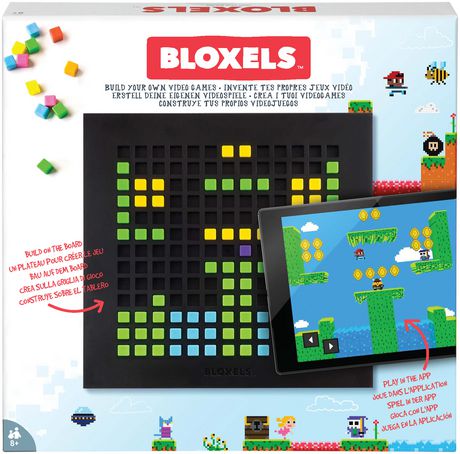
Bloxels add a physical dimension to game creation. The box (available for about $20.00 on Amazon) contains a 13 x 13 grid board and lots of color-coded cubes that fit in the grid. Each color represents a game element. Green - a terrain block, yellow - a coin block, purple - an enemy block, and so on. So the blocks are added to the board to create some part of a larger game. Scanning the board with your phone or tablet (the app is free) uploads your work to the game development site where you can edit, configure, and re-design the original board. You can add up to 169 different boards, so your game can be very simple or very complex. There are a lot of Youtube tutorials available, I've added a link to a very good and complete example here:
Video
tutorial for Bloxels https://www.youtube.com/watch?v=McCBp0-A250

SENSORS ALIVE
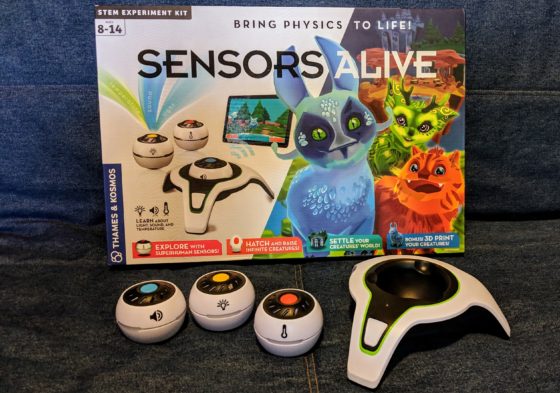
Thames & Kosmos' Sensors Alive is an app-based STEM experiment kit that utilizes real-world sensor data to create unique creatures that kids can collect, play with, and take care of. The sensors provide readings for light, temperature, and sound. The readings, once uploaded, determine what type of creature will be created. You can continue to use the sensors, and work with the data to adjust the creatures, their food source, and their environment. Sensors Alive is available on Amazon, for $90.00. On Youtube: https://www.youtube.com/watch?v=rFbpSF8v2S0 You can also 3D print the creature you've developed (I haven't tried that but I'm guessing you can download a prepared .stl file from the app site.)

OSMO
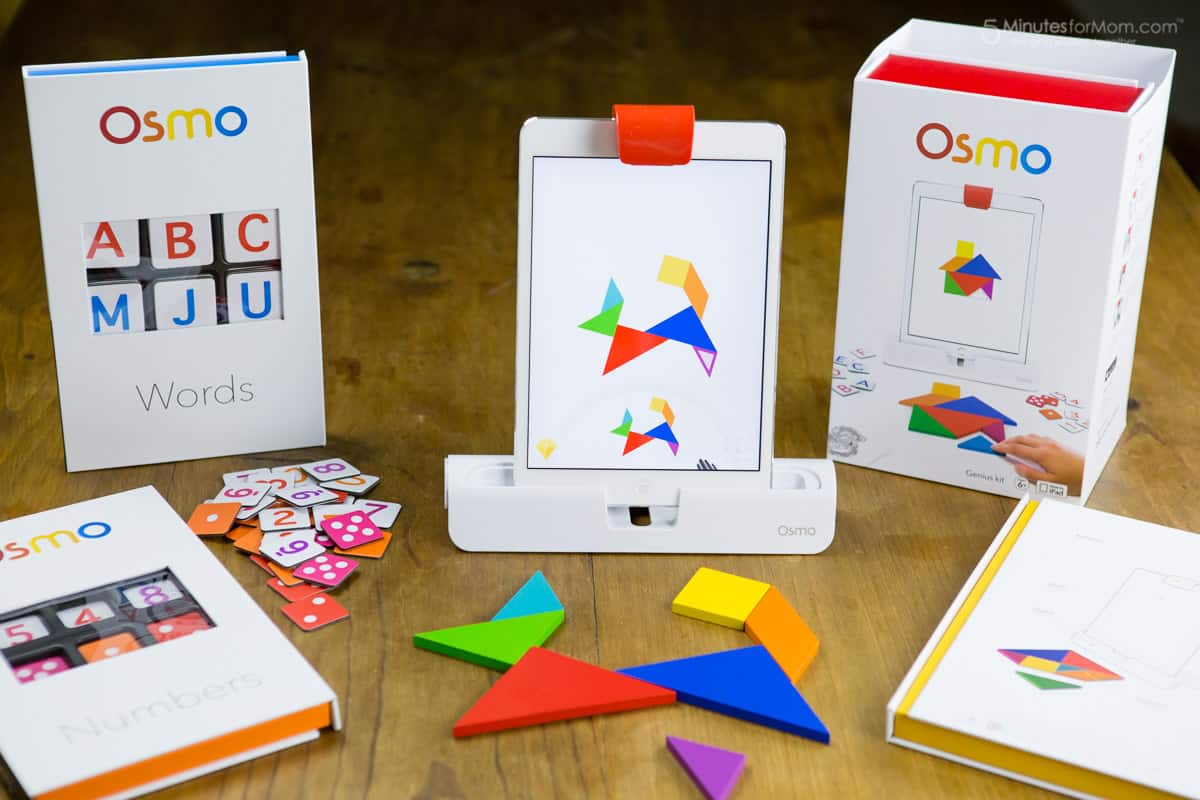
The basic Osmo system contains a base for your IPad to sit in and a reflective mirror that attaches to the tablet's camera. The reflector allows the camera to record the area in front of the device, which lets the Osmo apps "see" the objects placed there. The IPad can then watch as you manipulate various objects or draw images in the visible area. Current OSMO apps are for tangrams, coding blocks, and even maps. You can start by buying a kit which includes apps and the base. An example would be the Genius kit which is available on Amazon for about $95.00. The kit includes the base, tangram blocks, and word tiles. Once you have the base you can by separate apps for things like coding, drawing, or the newest app, a detective game based on maps. OSMO is currently available only for IPads and the Fire Tablet. A good introductory video: https://www.youtube.com/watch?v=87hKzrjRWww

Monday, March 11, 2019
Quiver Augmented Reality Coloring Pages
Quiver is an app that allows users to create a 3D animated version of a page they've colored. The app has both pay and free versions, for both Apple and Android phones and tablets. I've been testing the free version and it seems to work very well. There are lots of Quiver coloring pages on the website and many can be downloaded, as PDFs, for free. Some of the page sets do require payment.
It's very easy to use - download the app, download some pages and print them, color the pages, then bring up the app and aim at the page. It looks something like this on your phone/tablet screen:
Touching the image will bring up an identification key as well as options for screen capture as an image or a video.
Saturday, March 9, 2019
Introductory presentation on augmented reality and virtual reality in Education
This is a short presentation I created providing a quick introduction to augmented reality and virtual reality. It has some good links for those interested in the topic.
There is also some information on creating animated 3D content linked to 3D printing/design/scanning. While this is not, by definition, AR, it's still an interesting way to augment 2D content by adding a 3D component. As an example of that connection, I've linked to a file in my Sketchfab account, originating from an .stl file downloaded from www.thingiverse.com, Makerbot's T-Rex skull.
You can also insert 3D models from a number of file types (.stl, .obj) in new versions of Microsoft Word and PowerPoint.
Subscribe to:
Comments (Atom)

